概要
- クライアント証明書認証を行うリバースプロキシサーバを構築する方法を説明します。
- フロントのリバースプロキシサーバ、バックエンドにWebアプリを配置した構成を想定しています。
- リバースプロキシサーバでは、クライアント証明書の署名や有効期限などを検証する想定です。
- Webアプリでは、サインインユーザが当該ユーザに対して発行されたクライアント証明書を使っているかを検証する、等のようにWebアプリでも追加の検証を行う想定をしています。そのため、リバースプロキシサーバからWebアプリにクライアント証明書関連の情報を引き渡す前提の手順になっています。
- 前提とする環境は次の通りです。
- Windows 10(64ビット)環境を使用します。
- プロキシサーバとしてWindows向けのApache httpdを使用します。使用するバージョンは、Apache Loungeの2.4.43-win64-VS16です。
- ここではあくまでの開発環境での検証を目的としているため、最低限の設定内容になっています。
本番使用を想定する場合はセキュリティや性能等の考慮した設定を検討してください。 - 単純なリバースプロキシサーバの構築であれば、こちらをご覧ください。
- なお、サンプルのクライアント証明書にある”Ken Sato”は適当な名前であり、他意はありません。
リバースプロキシサーバの仕様概要
ここで構築するリバースプロキシサーバの仕様は次の通りです。
- リバースプロキシサーバで公開するURI
https://localhost:8443/ - 転送先のWebアプリURIは下記を想定
※ポート番号等は実行環境に合わせて修正してください。https://localhost:44338/ - SSL/TLSを有効にする。
自己署名のルートCA証明書を作成し、この証明書で署名したサーバ証明書とクライアント証明書を使用する。
(運用環境では、サーバ証明書の署名は公的なルートCAになるので、サーバ証明書とクライアント証明書で同一のルートCA証明書を使うことはないと思います。) - クライアントからのクライアント証明書の提出は任意(Optional)
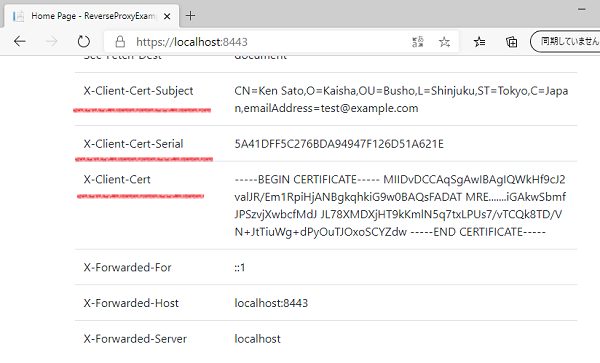
- 転送時にクライアント証明書の情報を次のヘッダに付与
経験的にシリアル番号を使う機会が多いのですが、ここではサンプルとしてサブジェクトやクライアント証明書そのものを付与しています。
設定可能な値については、Apahce httpdリファレンスに記載されている”SSL_CLIENT_”で始まる環境変数をご覧ください。HTTPヘッダ名 説明 X-Client-Cert-Subject クライアント証明書のサブジェクト
(httpd環境変数: “SSL_CLIENT_S_DN”)X-Client-Cert-Serial クライアント証明書のシリアル番号
(httpd環境変数: “SSL_CLIENT_M_SERIAL”)X-Client-Cert クライアント証明書そのもの(PEM形式)
(httpd環境変数: “SSL_CLIENT_CERT”) - 関連ファイルの配置場所フォルダ
C:\reverse-proxy-client
(参考)Webアプリでのクライアント証明書の検証の補足
- 一般ユーザはパスワード認証だが、マイナンバーを操作するユーザには追加の認証を用意したい場合に、クライアント証明書認証が使用される場合があります。
- このようなシチュエーションでは、サインインユーザが当該ユーザに対して発行したクライアント証明書を使用しているかを検証する必要があります。
- リバースプロキシサーバでは「署名が正しい(証明書が改ざんされていない)」「有効期限内」「失効していない(証明書失効リストCRLに定義された証明書ではない)」を検証できますが、前述のサインインユーザ情報と紐づけた検証はWebアプリ側でしかできません。
(リバースプロキシサーバではサインインユーザの情報がないため。) - クライアント証明書はシリアル番号で識別できます。シリアル番号はルートCA毎に一意な番号であり、特定のルートCAで発行された証明書のシリアル番号は一意になります。
(なお、異なるルートCAで発行された証明書のシリアル番号は重複する可能性があります。) - ユーザに対してクライアント証明書を発行した際に、証明書のシリアル番号をユーザマスタに登録しておき、ユーザがサインインした際に提出されたクライアント証明書のシリアル番号と突合するような検証になります。
- 商用のクライアント証明書管理サービス等の外部システムを使用する場合、サインイン時に提出されたクライアント証明書が当ギアユーザに発行されたものかを検証するために、シリアル番号を外部システムに問合せする必要があるかもしれません。
このような状況では外部システムに対する問合せのコストが高くなるので、クライアント証明書のサブジェクトの氏名やメールアドレス等がサインインユーザのものと一致するかを先に検証する方法も考えられます。
(リバースプロキシサーバ側の署名検証でクライアント証明書が改ざんされていなことを検証できるので、この場合はクライアント証明書のサブジェクト等の情報は信頼できます。)
構築手順
インストール
Apache httpdをダウンロードし、所定のフォルダに展開します。
- httpdサーバのダウンロード
Apacheのダウンロードページから[Files for Microsoft Windows]のリンクを開きます。
ApacheHaus, Apache Lounge等のいくつかのバージョンがありますが、ここではApache Loungeの[httpd-2.4.43-win64-VS16.zip]をダウンロードします。 - ダウンロードファイルの配置
ダウンロードしたバイナリを”C:\reverse-proxy-client”直下に展開します。
展開後は次のようなフォルダ構造になる想定です。C:\reverse-proxy-client\httpd-2.4.46-win64-VS16\Apache24\...
証明書の準備
ルートCA証明書を作成し、この証明書で署名したサーバ証明書とクライアント証明書を使う前提とし、証明書の準備を行います。
- 自己署名ルートCA証明書とサーバ証明書の準備
こちらの情報を参考に、PEM形式の証明書を作成します。証明書ファイル名 説明 server-ca.crt サーバ証明書用ルートCA証明書 server.crt サーバ証明書 server.key サーバ証明書の鍵 client-ca.crt クライアント証明書用ルートCA証明書(内容は前述のserver-ca.crtのコピー) - 証明書ファイルの配置
準備した証明書ファイルを次のフォルダにコピーします。C:\reverse-proxy-client\httpd-2.4.46-win64-VS16\Apache24\conf(後述のhttpd.confでは、証明書の配置フォルダとしてconfフォルダを想定しており、これに合わせています。)
httpサーバの設定
基本設定
httpd.confを次のように編集します。
詳細はApacheのリファレンスを参考のこと。
なお、編集前にhttpd.confをhttpd.conf.orgにコピーする等の退避を推奨します。
...
#
# ServerRoot: The top of the directory tree under which the server's
# configuration, error, and log files are kept.
#
# Do not add a slash at the end of the directory path.  If you point
# ServerRoot at a non-local disk, be sure to specify a local disk on the
# Mutex directive, if file-based mutexes are used.  If you wish to share the
# same ServerRoot for multiple httpd daemons, you will need to change at
# least PidFile.
#
Define SRVROOT "C:\reverse-proxy-client\httpd-2.4.46-win64-VS16\Apache24"

...
#
# Listen: Allows you to bind Apache to specific IP addresses and/or
# ports, instead of the default. See also the <VirtualHost>
# directive.
#
# Change this to Listen on specific IP addresses as shown below to
# prevent Apache from glomming onto all bound IP addresses.
#
#Listen 12.34.56.78:80
Listen 127.0.0.1:8888

...
#
# Dynamic Shared Object (DSO) Support
#
...
LoadModule headers_module modules/mod_headers.so
LoadModule proxy_module modules/mod_proxy.so
LoadModule proxy_http_module modules/mod_proxy_http.so
LoadModule socache_shmcb_module modules/mod_socache_shmcb.so
LoadModule ssl_module modules/mod_ssl.so

...
#
# ServerName gives the name and port that the server uses to identify itself.
# This can often be determined automatically, but we recommend you specify
# it explicitly to prevent problems during startup.
#
# If your host doesn't have a registered DNS name, enter its IP address here.
#
ServerName localhost:8888

...
# Secure (SSL/TLS) connections
Include conf/extra/httpd-ssl.conf

...- 12行目: Apacheのホームフォルダを指定する。
- 24行目: HTTP要求の受付インターフェイス・ポートを指定する。今回の用途ではSSL/TLSを使用する前提なので任意の値を指定している。
- 31-35行目: クライアント証明書認証を含むSSLを有効化するためにmod_ssl, mod_socache_shmcbを有効にする。クライアント証明書関連のHTTPヘッダを設定するためにmod_headeresを有効にする。
リバースプロキシとして動作させるためにmod_proxy, mod_proxy_httpを有効化する。 - 45行目: 起動時の警告を回避するために適当な名前を指定した。
- 49行目: SSL/TLSの設定を組み込む。
SSLとリバースプロキシ
httpd-ssl.confを次のように編集します。
詳細はApache httpdリファレンスのmod_proxy, mod_sslを参考のこと。
クライアント証明書認証に関してはSSL/TLS Strong Encryption: How-Toを参考のこと。
なお、編集前にhttpd-ssl.confをhttpd-ssl.conf.orgにコピーする等の退避を推奨します。
...
#
# When we also provide SSL we have to listen to the
# standard HTTP port (see above) and to the HTTPS port
#
Listen 8443

...
##
## SSL Virtual Host Context
##

<VirtualHost _default_:8443>

#   General setup for the virtual host
DocumentRoot "${SRVROOT}/htdocs"
ServerName localhost:8443
ServerAdmin admin@example.com
ErrorLog "${SRVROOT}/logs/error.log"
TransferLog "${SRVROOT}/logs/access.log"

...
#   Server Certificate:
#   Point SSLCertificateFile at a PEM encoded certificate.  If
#   the certificate is encrypted, then you will be prompted for a
#   pass phrase.  Note that a kill -HUP will prompt again.  Keep
#   in mind that if you have both an RSA and a DSA certificate you
#   can configure both in parallel (to also allow the use of DSA
#   ciphers, etc.)
#   Some ECC cipher suites (http://www.ietf.org/rfc/rfc4492.txt)
#   require an ECC certificate which can also be configured in
#   parallel.
SSLCertificateFile "${SRVROOT}/conf/server.crt"
#SSLCertificateFile "${SRVROOT}/conf/server-dsa.crt"
#SSLCertificateFile "${SRVROOT}/conf/server-ecc.crt"

#   Server Private Key:
#   If the key is not combined with the certificate, use this
#   directive to point at the key file.  Keep in mind that if
#   you've both a RSA and a DSA private key you can configure
#   both in parallel (to also allow the use of DSA ciphers, etc.)
#   ECC keys, when in use, can also be configured in parallel
SSLCertificateKeyFile "${SRVROOT}/conf/server.key"
#SSLCertificateKeyFile "${SRVROOT}/conf/server-dsa.key"
#SSLCertificateKeyFile "${SRVROOT}/conf/server-ecc.key"

#   Server Certificate Chain:
#   Point SSLCertificateChainFile at a file containing the
#   concatenation of PEM encoded CA certificates which form the
#   certificate chain for the server certificate. Alternatively
#   the referenced file can be the same as SSLCertificateFile
#   when the CA certificates are directly appended to the server
#   certificate for convenience.
SSLCertificateChainFile "${SRVROOT}/conf/server-ca.crt"

#   Certificate Authority (CA):
#   Set the CA certificate verification path where to find CA
#   certificates for client authentication or alternatively one
#   huge file containing all of them (file must be PEM encoded)
#   Note: Inside SSLCACertificatePath you need hash symlinks
#         to point to the certificate files. Use the provided
#         Makefile to update the hash symlinks after changes.
#SSLCACertificatePath "${SRVROOT}/conf/ssl.crt"
SSLCACertificateFile "${SRVROOT}/conf/client-ca.crt"

...
#   Client Authentication (Type):
#   Client certificate verification type and depth.  Types are
#   none, optional, require and optional_no_ca.  Depth is a
#   number which specifies how deeply to verify the certificate
#   issuer chain before deciding the certificate is not valid.
SSLVerifyClient optional
#SSLVerifyDepth  10

...
#   Per-Server Logging:
#   The home of a custom SSL log file. Use this when you want a
#   compact non-error SSL logfile on a virtual host basis.
CustomLog "${SRVROOT}/logs/ssl_request.log" \
          "%t %h %{SSL_PROTOCOL}x %{SSL_CIPHER}x \"%r\" %b"

# reverse proxy settings
SSLProxyEngine on
ProxyRequests Off
ProxyPass / https://localhost:44338/
ProxyPassReverse / https://localhost:44338/

# Add proxy information in X-Forwarded-* headers(default: on)
ProxyAddHeaders On

# Add Client Certificate information
RequestHeader set X-Client-Cert-Subject %{SSL_CLIENT_S_DN}s
RequestHeader set X-Client-Cert-Serial  %{SSL_CLIENT_M_SERIAL}s
RequestHeader set X-Client-Cert         %{SSL_CLIENT_CERT}s

</VirtualHost>- 6行目: SSL/TLS用ポートとして8443を指定する。
- 13, 17行目: SSL/TLS用のバーチャルホストを宣言する。
- 33行目: サーバ証明書ファイルのパスを指定する。(既定値のまま)
- 43行目: サーバ証明書(鍵)ファイルのパスを指定する。(既定値のまま)
- 54行目: ルートCA証明書ファイルのパスを指定する。(既定値のまま)
- 64行目: クライアント証明書の検証に使用するルートCA証明書パスを指定する。
- 72行目: クライアントからのクライアント証明書の提出を任意(optional)に指定する。
- 83-86行目: リバースプロキシサーバの動作を指定する。
- SSLでのリバースプロキシを有効にするためにSSLProxyEngineを指定
- フォワードプロキシとしての動作(クライアントの情報を隠す)を無効するためにProxyRequestsを指定
- リバースプロキシのURIと転送先URIを対応付けするためにProxyPass, ProxyPassReverseを指定
- 89行目: クライアントのIPアドレス(X-Forwarded-For)、元々の要求ホスト名(X-Forwarded-Host)、プロキシサーバ名(X-Forwarded-Server)を転送先に送信するためにProxyAddHeadersを指定
(既定で有効だが、意図を明確にするために明示的に指定) - 92-94行目: クライアント証明書関連の情報(httpdの環境変数)をHTTPヘッダに設定
動作確認
- 転送先のアプリの起動
転送先となるアプリを起動します。
Visua Studio用のサンプルプロジェクトであれば、こちらで公開しています。このアプリではHTTP要求ヘッダをダンプします。 - apachenの起動
次のフォルダにあるhttpd.exeを実行します。C:\reverse-proxy-client\httpd-2.4.46-win64-VS16\Apache24\bin - クライアント証明書のインストール
「証明書の準備」で準備したクライアント証明書用のルートCA証明書で署名したクライアント証明書を作成し、証明書ストアの[個人]にインストールします。
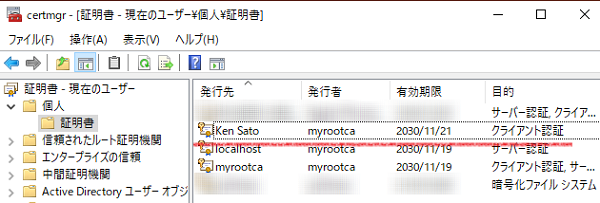
- こちらの手順でクライアント証明書を作成している場合、既に証明書ストアにクライアント証明書が格納されているため、追加の作業は不要です。
- クライアント証明書ファイルをインストールする場合、証明書ストアの[個人]を選択してインポートします。
- ブラウザでの確認
ブラウザでリバースプロキシのURIを開きます。https://localhost:8443/次のように使用するクライアント証明書を選択するダイアログが表示されることを確認します。

また、HTTPヘッダにクライアント証明書の情報が付与されていることを確認します。